Tutorial - How to set up Territories and Territory Groups
- Simon Webb

- Feb 2, 2023
- 4 min read
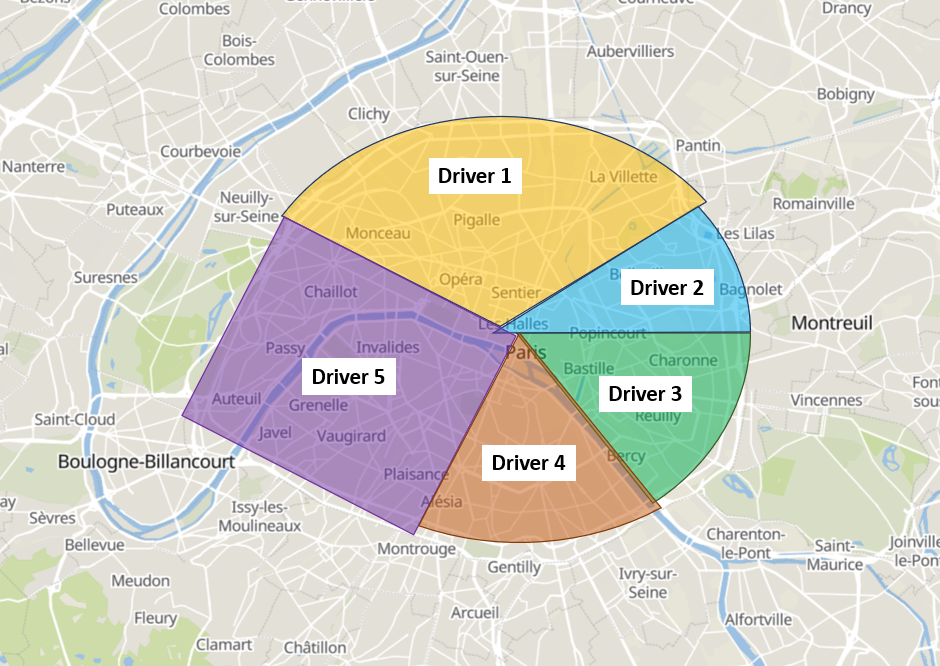
Territories and Territory Group functionality in Tarot Routing allows you to define a geographic area in which Jobs can only be allocated to Drivers who have been assigned that Territory. In short, it allows you to tell the optimisation algorithm that these Jobs MUST go to this driver.

Territories in Melbourne, Australia
When should you use Territories?
There are many reasons why you might use Territories depending on your business and operations.
Territories are an optimisaiton constraint, using territories will result in less efficient routes being planned.
However territories may allow you to be more efficient in other aspects of your operations (e.g. picking and packing in the warehouse).
What are Territory Groups?
Territory Groups are ... well .... a group of Territories. You need to create a Territory Group first and then create Territories inside the group
Don't worry, if you've previously created a Territory in a different Group you can re-use the Territory in another Territory Group
How to create a Territory Group
To create a Territory Group or a Territory, first you need to open the Territory Builder. You can do this from the map interface by clicking the top right hand corner drop down menu and selecting "Territory Builder"

Or you can access it from the Admin Panel, go to Organisation Settings > Territories and select Open Territory Map Editor

Once clicked you will open the Territory Builder Map Interface. It should look something like this.

In the Territory Groups map panel on the left hand side of the screen you will be able to see any existing Territory Groups. Click on a Territory Group to see an outline of its Territories.
To create a new Territory Group click Create Territory Group at the bottom of the panel or, click Edit to add or adjust Territories in an existing Group
How to create a Territory
Create or open an existing Territory Group. Scroll to the bottom of the Territories Panel on the left hand side of the map interface and click "Create Territory"

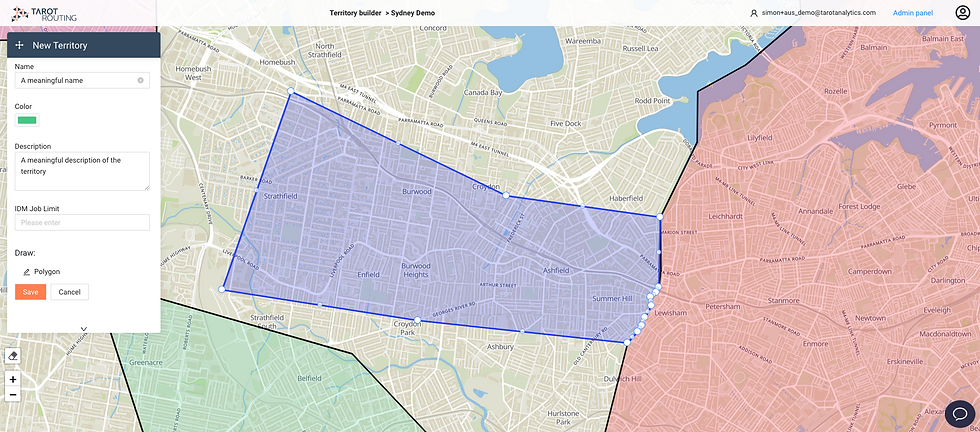
The Create/Edit Territory interface will open where you can set the Territories attributes and start to draw the territory on the map.

First give the territory a meaningful name and description, and set the colour. You can leave IDM Job Limit blank for now, unless you plan to use Interactive Delivery Management features to allow your customers to schedule and reschedue their deliveries.
Next, click the pencil next to Polygon to start drawing your territory on the map. Click to create each vertex.

If there are existing territories the mouse will try and snap to the existing vertexes so that the territories will join without overlapping. To finish drawing the territory click back on the first vertex to create the polygon

If you need to adjust the territory you created you can click and drag any Vertex, denoted by the large dots.

Alternatively, in the mid point of each line there is a small dot.

Clicking on this dot will split the line, creating a new vertex that you can click and drag to further refine the boundaries of your territory.

Now, with having finished drawing, click Save to create the Territory and return to the Territory Group.
How to re-use an existing territory in a new Territory group
Don't worry, if you've previously created a Territory in a different Group you can re-use the Territory in another Territory Group.

Create the Territory Group as you normally would, then click Add Existing Territory and select any existing territories you wish to apply to this Territory Group.
NOTE: If you edit a Territory that is applied to multiple Territory Groups any changes will be reflected in all Territory Groups.
How to apply territories to a Driver
Now, you've successfully created some Territory Groups and Territories but we are only half done. Next, we need to apply territories to Drivers in order to tell the optimisation algorithm that a particular driver can serve jobs that are inside a designated territory.
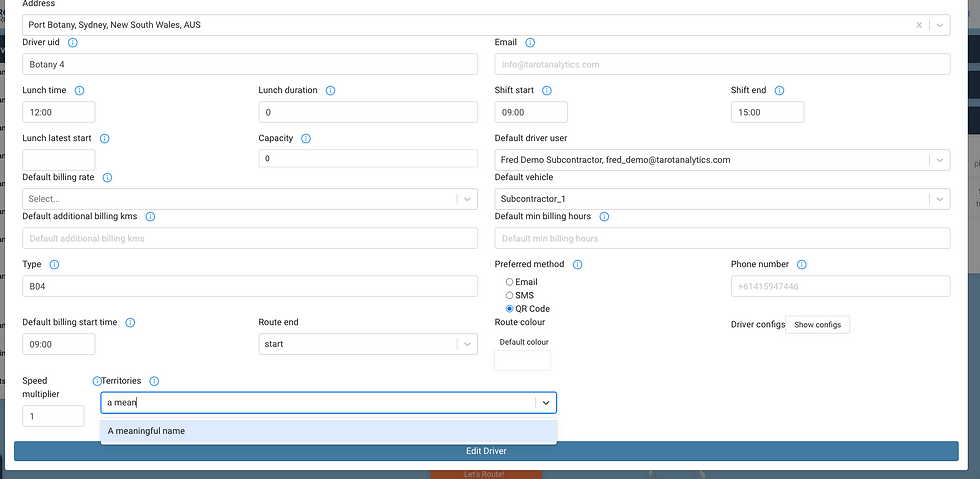
To apply territories to a Driver right click and edit the driver in a Scenario that is in the Planning Stage, or edit the driver from the admin panel. Click on the territories drop down to open a list of all territories. You can type in the territory name to refine your choice. Once you can see the territory click it to select and then click Edit Driver to save your changes.

You can apply multiple Territories to a Driver. To check what territories have been applied to a driver you can click on the Driver in the Drivers Map panel. The Driver Information map pop-up will show territories applied to the Driver.

How to apply a Territory Group to a Scenario
Finally, a Territory Group must be applied to a Scenario in order to tell the Optimisation Algorithm to consider territories when planning Routes. You can do this when creating a Scenario by clicking More Options and applying a Territory Group.

If you have already created a Scenario you can edit the scenario to apply a new Territory Group or to change/remove an existing Territory Group.

In the Map View, once you have applied a Territory Group to the Scenario you can turn the territories on and off to see them by clicking Show Territories from the Map Layers menu in the bottom left hand side of the Map.
NOTE: As a time saving hack, you can use Scenario Templates to automatically apply Territory Groups and set Drivers active when you create a Scenario. You can learn about using Scenario Templates in this post
Optimise
Now, we've
created our Territory Group,
drawn Territories,
applied Territories to our Drivers
Created a Scenario and applied the Territory Group
We're ready to optimise!
Upload your Jobs, activate Drivers and click Let's Route!
Any other Questions?
You can always book a demo or reach out to our team for assistance


Comments