
Tutorial - How to Run your First Optimisation in Tarot Routing
- Simon Webb

- May 22, 2023
- 4 min read
So, you've created an account, started a Free Trial and (hopefully) completed our walkthrough tutorial. Congratulations!!!! Now it's time to get Tarot Routing setup for your business and run an optimisation with your own Jobs.
(If you haven't yet started a Free Trial, what are you waiting for? - Click here and get started)
This tutorial will detail how to setup an Optimisation Scenario then Create Jobs, activate Drivers and start an Optimisation.
Log in
First, log in to your account if you are not already there. Head to https://route.optimiser.app/ and use the email and password you signed up with
Create a Scenario
Next, we need to create a new optimisation Scenario from the Scenarios Map Panel on the right hand side of your screen.
A Scenario is a list of Jobs that are to be Planned, Routed and Dispatched together. Every Scenario has a Name and Scheduled Date. It might be best to think of a Scenario as a Delivery Wave or a day's activity.

Open the Scenario Action Bar and click Add Scenario. Give the Scenario a Name and Scheduled Date and Create the Scenario. (Don't worry about Scenario Templates now, you can learn about them later here)

Your New Scenario will be created and set Active, ready for you to create Jobs, Activate Drivers and Optimise.
Tip - Active Scenario. Make sure you're working in the right Scenario. The Active Scenario will be highlighted with a blue bar and will default to the top of the Scenario Panel. To set another Scenario Active, hover your mouse over it and click Activate

Create Jobs
Now we have a Scenario we can create some Jobs into it. There are a few ways to create Jobs in Tarot Routing, but the Bulk Create Jobs modal or Excel upload are the fastest way for a new User to get started.
Jobs in Tarot Routing are places to be visited during a Driver’s Run. At a minimum a Job has a UID (unique identifier, e.g. order number, client number etc.), Location (address) and Duration (estimated time in minutes spent stopped). A Job may have multiple other Optimisation Constraints which impact how the Optimiser plans Runs.
Job Attachments are Units to be loaded and delivered, or Returns to be picked-up from, a Job. Units and Returns are additional modules in Tarot Routing if you wish to use these modules please Book a Demo and a Tarot Team Members can add them to your account
Bulk Create Jobs
To create Jobs with the Bulk Create Jobs modal Open the Jobs Action Bar and click Bulk Create Jobs.

To create a Job in the Bulk Create Job modal you need to fill in at least the Job UID, Address and Duration. Other fields are optimisation constraints or used in delivery management functionality.
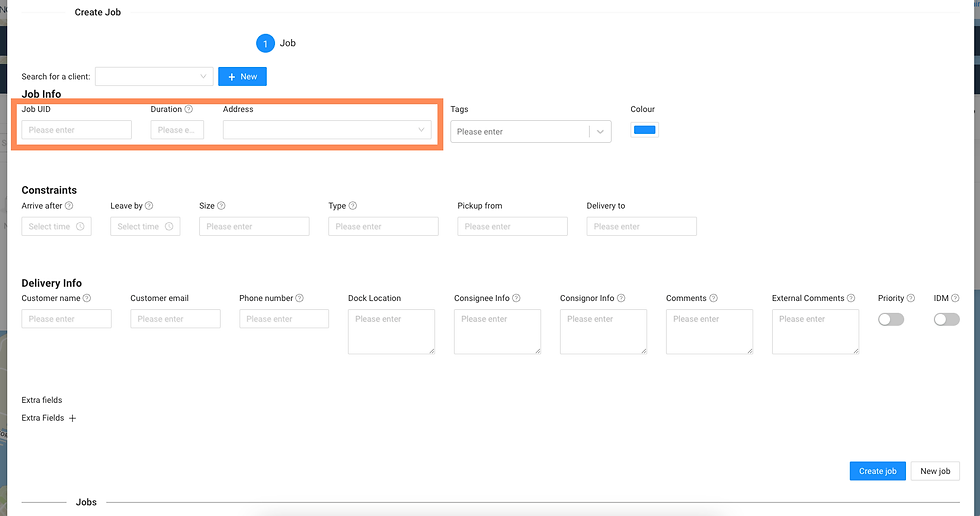
Once a Job has been Created it will be added to the Job list below. To add another Job, click New Job to clear the form and go again.
Excel Upload
Using Excel to upload Jobs can be the fastest way to get your deliveries into Tarot Routing without an API or automated data connection. To create Jobs from Excel, open the Jobs Panel and navigate to the Load Tab. Click Download Sample Spreadsheet to get an example excel upload template.

Open the Excel file once the download is complete. It should look something like this, populated with example data.

Feel free to clear the example data and start to add some of your own. Comments have been added to each of the columns in the file to help you understand the required data.
Required Fields

At a minimum the upload must include:
A uid - Unique Identifier of the Job, can be anything.
Address - Street address that can be geocoded.
Duration - Estimated time in minutes it will take to complete the Job.
Optimisation Constraints

Optimisation Constraints are optional fields. If you have complex optimisation constraints, we recommend that you book a demo with a member of the Tarot Analytics team.
Customer Information

Customer information is not considered by the optimisation but can be uploaded so that you can inform you drivers of important delivery information through the Driver App and so that you can communicate delivery status and ETAs with your customers.
Activate Drivers
Drivers in Tarot Routing are best thought of as a template the Optimiser uses to build Runs (Driver plus Jobs in an optimised sequence). Before starting an optimisation, you need to Activate the Drivers who are working so the optimiser knows which Drivers can have Jobs allocated to them.
A Run is unique to the Scenario it was optimised in, while a Driver will persist to be activated and optimised daily.
Create Drivers
If you completed the onboarding tutorial, then you would have automatically created 3 drivers. If not, or to create more, Open the Drivers Panel Action Bar and click Add Driver.

At a minimum a Driver has a UID, Start and End Location (these may be different locations) as well as a Shift Start (planned departure time from Start Location) and a Shift End (latest possible arrival time at End Location). A Driver may have other Optimisation Constraints which impact how the Optimiser plans Runs.

Edit Driver
To edit (or delete) an existing Driver right click and select Edit Driver

You can Copy Driver, a faster way to create drivers leaving from the same location at the same time.
Activate Drivers
With your Drivers setup finished, select the checkbox next to the Drivers who are working to set them Active, ready to be optimised.

Optimise
With Jobs uploaded and Drivers active you're ready to optimise. Click Let's Route to start an optimisation.

The Optimisation Algorithm will take the Active Drivers and Jobs to calculate which driver should do which Job in what order so to minimise the driving time across the fleet. Once the calculation has finished the Scenario will advance from the Planning Stage to the Routing Stage ready for you to review the Runs planned and dispatch them to your Drivers.

Optimisation Settings
If you are optimising lots of Jobs you might want to let the optimisation calculate for longer so a better result can be found. To adjust Optimisation Settings go to the Admin Panel > Organisation Settings > Optimisation Settings

By default Quick Optimisation will be set to True. Uncheck this box to set a Maximum Optimisaiton Time (in seconds) and an Improvement Threshold per second.

Decreasing the Improvement Threshold per second or increasing the Max optimisation time will let the calculation run for longer, improving the results.
Book a Demo
And that is it! You've now Run your first optimisation in Tarot Routing. Go and do another one or Book a Demo with our team so we can help you get setup and optimising every delivery.

Comments